
SAP Ariba Cloud Integration Gateway (CIG) enabled by SAP Cloud Platform Integration (CPI) is an offering that integrates SAP Ariba solutions into an existing customer infrastructure. CIG provides an efficient way to integrate buyer and supplier systems through one gateway to Ariba Network and Ariba solutions in the cloud.
By standard CIG supports integration between SAP ERP and S/4 HANA with Ariba Network and Ariba Solutions, it is important to know how to configure it whenever you work on a project involving such integration.
When it comes to accessing the CIG portal, this comes prepackaged along with Ariba Network and Ariba Solutions, you only have to enable and start using it. It’s that simple!
You can enable CIG from both Ariba Network as well as Ariba Buying and Invoicing site. If you want to know how this works read on while I take you through the necessary steps to achieve this, from configuration to extension, to testing!
Enable CIG from Ariba Buying and Invoicing
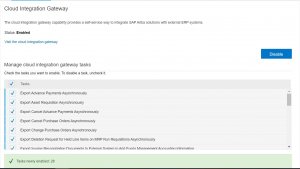
Manage -> Core Administrator -> Integration Manager -> Cloud Integration Gateway
Select the check boxes Enable CIG and terms and conditions. Now from the Task lists select the Interfaces that you wish to use with CIG, click Save.

Now click on the link presented to you to open CIG portal.
CIG Homepage
CIG contains 8 tabs and each tab has its own significance, let’s have a look into “Home and My configuration” tab.
As we can see form the image above home page has 3 main blocks along with a button to Create a New Integration project. The first block gives us an overview of the Integration projects, second block is a reporting tab about the suppliers and third block is for accessing transaction tracker which gives an overview of all the transactions flowing through CIG.

As we can see form the image above the home page consists of 3 main blocks along with a button to “Create a New Integration project” (highlighted in blue). The first block gives us an overview of the Integration projects, second block is a reporting tab about the suppliers and third block is for accessing transaction tracker which gives an overview of all the transactions flowing through CIG.
My Configurations
My configuration contains 8 different tabs with 8 different configurations, let’s have a look into each of them in detail.
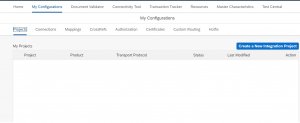
- Projects
In project tab we have a button to create new integration project. Before starting any transaction, we first need to create and configure an Integration project. Integration project specifies the details like which Ariba solutions the project is created for, which ERP system connection we need to use for the integration ect.
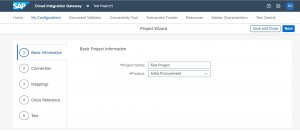
To create a project:
Click on Create New Integration Project button, give a project name and select Ariba Solution we want to use and click Next.
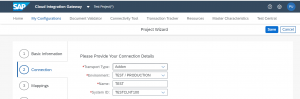
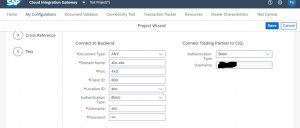
In this step we need to provide connection details:
- Transport Type -> Select HTTPS if we are using any middleware between CIG and ERP system, Select Addon if we are connecting CIG directly with ERP.
- Environment -> Its always advisable to select Test/Production
- Name -> Give a name for the connection
- System ID -> This is the backend ERP system ID (This detail can be directly synced from ERP to Ariba using tcode SPRO)
Document Type –> You can create a separate connection for different document types or just select Any for creating one connection for all document type Domain Name –> Give the ERP domain name that is configured in the Cloud Connector
- Port -> Port is always HTTPS port which 443
- Client ID -> Give ERP Client ID
- Location ID -> Give the location ID that is configured in Cloud Connector
- Authentication Type -> Select Basic or Certificate based on the requirement
- Give the ERP username and password if the Authentication type is Basic
Keep Connect trading partner to CIG as it is. Click save
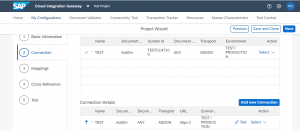
The connection is now saved and can be used for the integration. Now click next
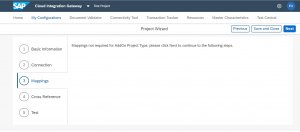
No action needed in Mapping tab, click next
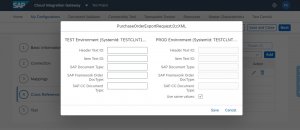
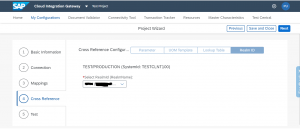
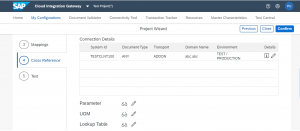
In the cross-reference tab, we can add cross reference values to given Document types. Select the document type from the drop down and click on Add

Once the document type is added, click on edit to maintain the cross-reference values and click save.
Click next, no action to be done in UOM template and Lookup Table tabs unless you have any specific configuration. Click next to go next tabs. In Realm ID tab select the Realm ID that you wish to connect to using the dropdown.
Click next, now you see a Confirm button. Click this button to confirm the project configuration.
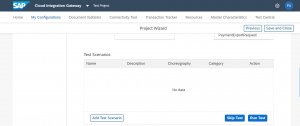
Once you confirm you go to the last tab, that is Test. If you scroll down to the bottom of the tab you see two Skip Test and Run Test. You can run the test on your project if you want to but do the Skip Test only when you are deploying the project to Production. Once you do skip test you get a button to mark the project for Go Live. You can just click Save and Close button to save your project.
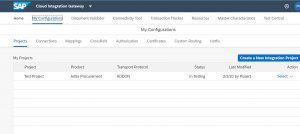
Now you see the project is created and added under my projects.
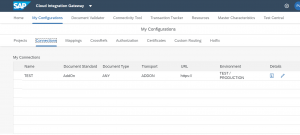
- Connections
This tab gives us the list of connections we have created, if ever needed to edit a connection we can do it from here.
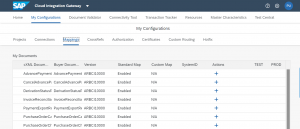
- Mapping
Ariba has provided a tool for any custom mappings under this section. Using this tool, we can do the changes to existing mapping or any new mapping as per our requirement. Please note that we still must raise an SR for any complex mappings, the tool can handle only simple mappings.
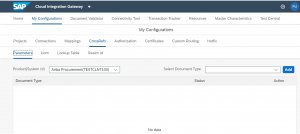
2.4 CrossRefs
This tab provides a quick access to different options of cross references.
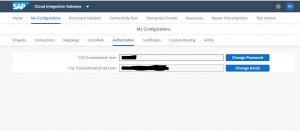
Authorization
This is the detail of your CIG user and email ID for any password changes.
Certificates
We can see the certificates if we have imported any for the authentication purpose.
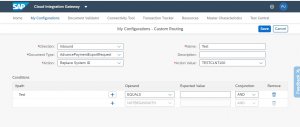
Custom Routing
We can create custom routing using this tab. Custom routings are nothing but certain conditions for sending any document to a particular system by changing the system ID.
Click on Create Custom Routing

- Direction -> Select the direction of your interface (Either Inbound or Outbound)
- Document Type -> Select the document type for which you want to set the custom routing
- Action -> Replace System ID
- Name -> Give a name for the custom routing
- Description -> Give description
- Action Value-> Value of the system ID that you want to replace system ID with
- Conditions -> Select a X Path under the conditions, this is the path for the field that you want to check for changing the system ID.
- Name -> Give a name for X path
- Description -> Give a description
- XPath -> Select the x path
- Data Type -> Select the type of that X Path field
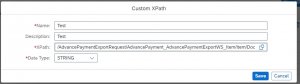
- Operand -> Select the Operand as per the condition we want to set
- Expected value -> Enter the value of X Path field for which System ID needs to be changed
- Conjunction -> We can add multiple conditions using conjunctions
Save the routing.
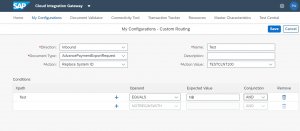
The above custom routing will change the System ID from *** to TESTCLNT100 when Advance Shipment Notice Document type is equal to NB.
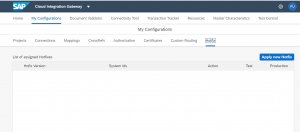
Hotfix
Any newly released hot fixes can be applied to CIG using this tab
As shown and explained one should be able to easily configure CIG using above steps. These steps are common for SAP ERP and SAP S/4 HANA integrations with Ariba. Before we configure the CIG we need to ensure all the configuration has been correctly done in SAP ERP and SAP S/4 HANA.
I hope this guide has been usefull to you.
Do you want to know more about SAP Ariba capabilities and how we can help your organization perform better. Feel free to contact us at sales@brainbox.consulting or call us at +31639175566 for a free consultation. We would love to get to know you and your organization better!
Author : Rutwhik Bhandarkar – Integration Consultant at Brainbox Consulting.